Here are some instructions on how to setup scanning to network folders on Windows 10 with your Sharp scanner. A lot of our users have upgraded to Windows 10, or gotten new computers that came pre-loaded with it, so we are helping them out with these simple instructions. The process for creating new users and using existing users for scanning authentication has become confusing but with these DIY tips you should be able to get it done yourself.
Note: You do not need to follow these instructions by the letter. You are welcome to use your existing sign-in information, or existing shared folders to scan to, but these guidelines should help you through the process.
Getting Started
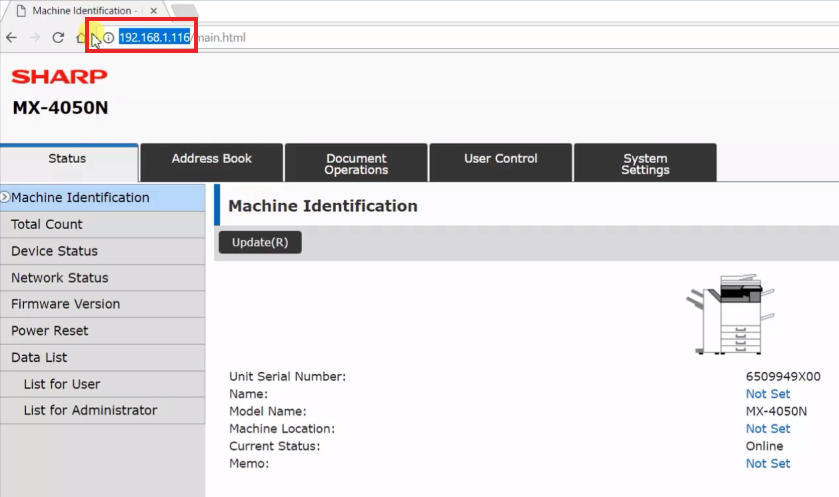
Before you get started you’ll need your printer’s IP address. If you do not have the printer’s IP you can print it from the machine following the steps in this post: How To Print Status Page with Network Config Information
Create the User for Scanning Authentication
- Open the control panel by typing Control Panel into your search bar at the bottom of the screen, then clicking Control Panel
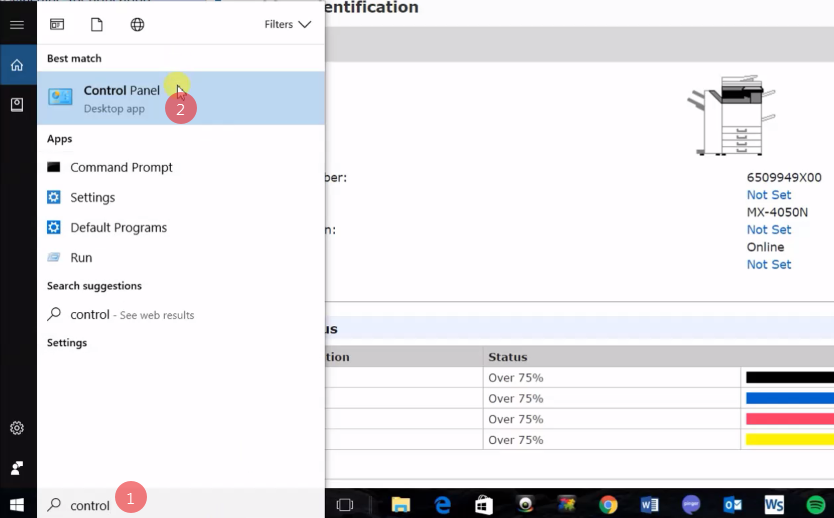
- Click User Accounts
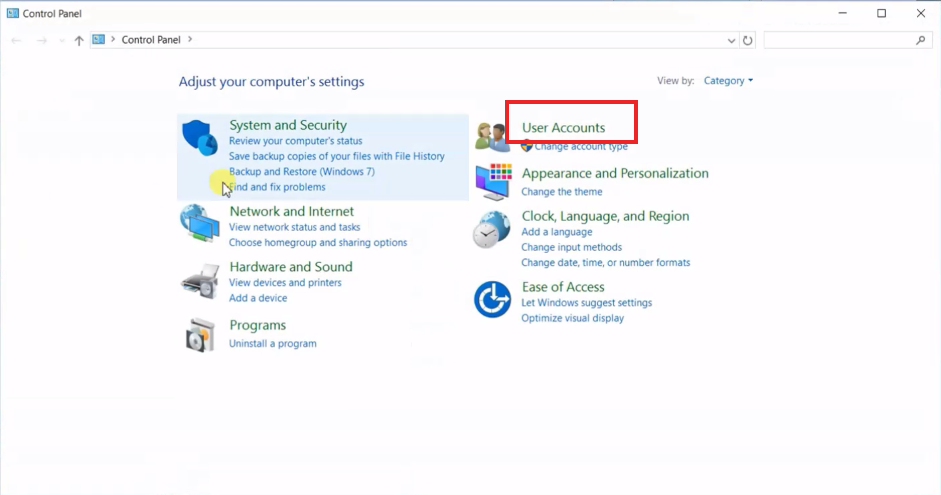
- Click User Accounts again
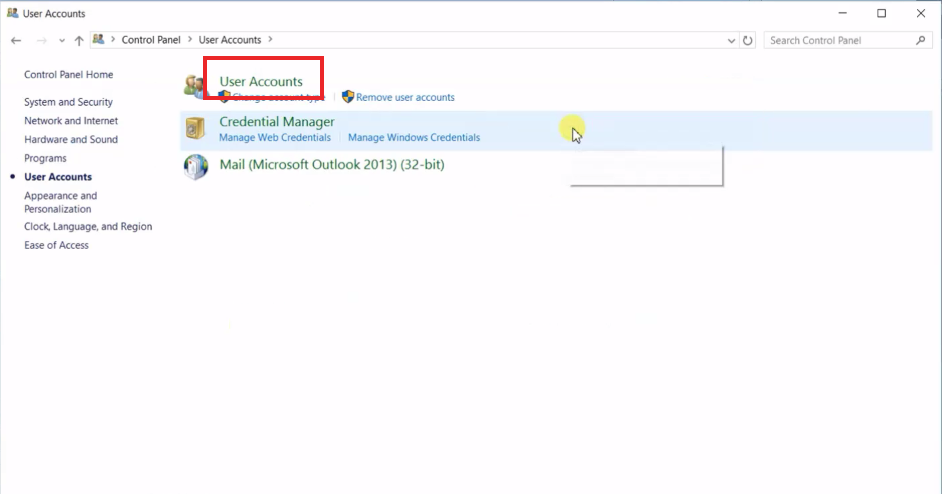
- Click Manage another account
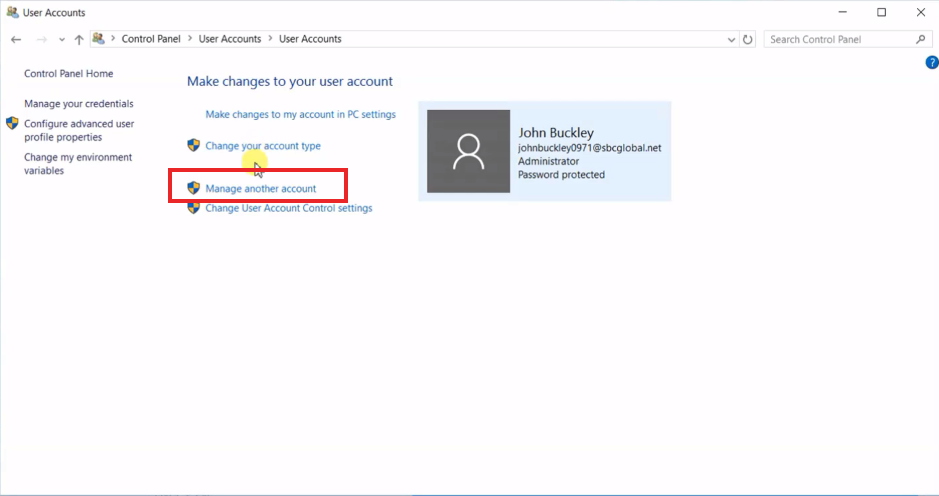
- Click Add a new user in PC settings
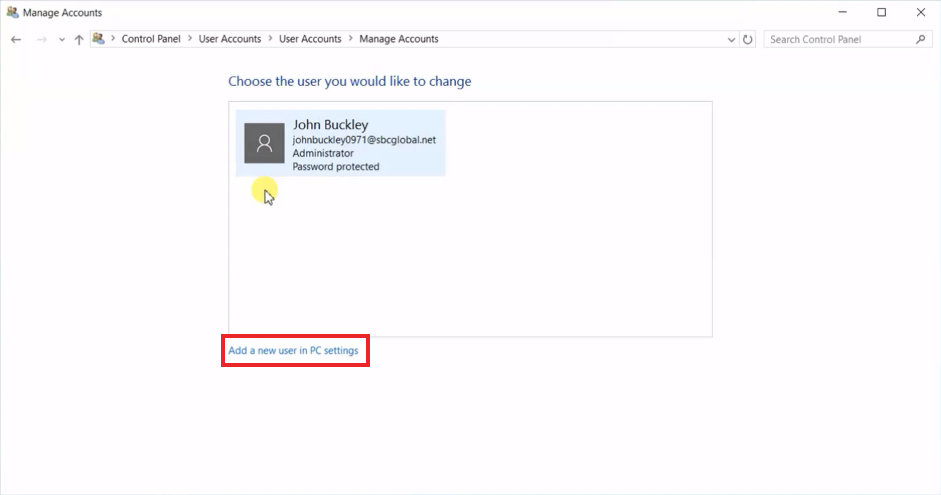
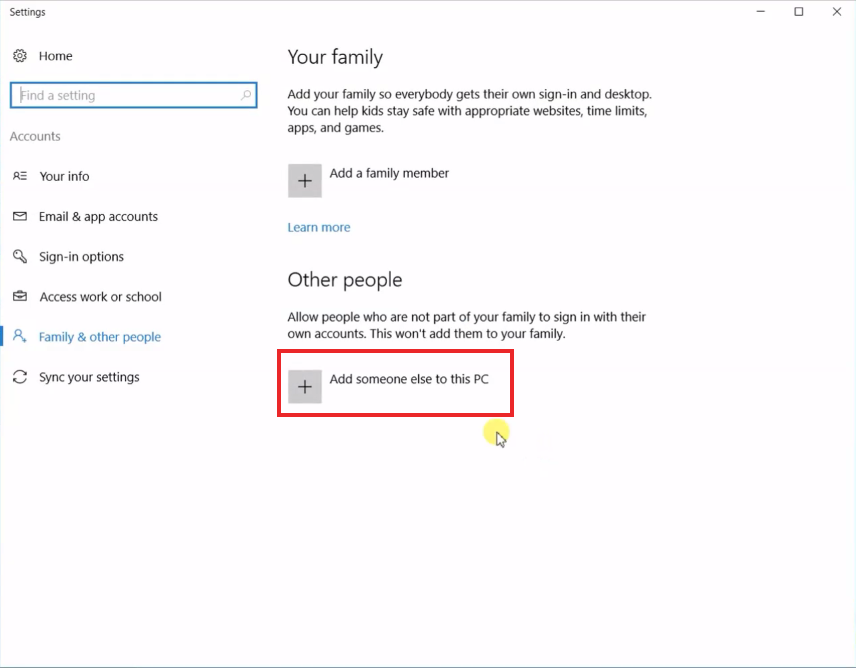
- Click Add someone else to this PC
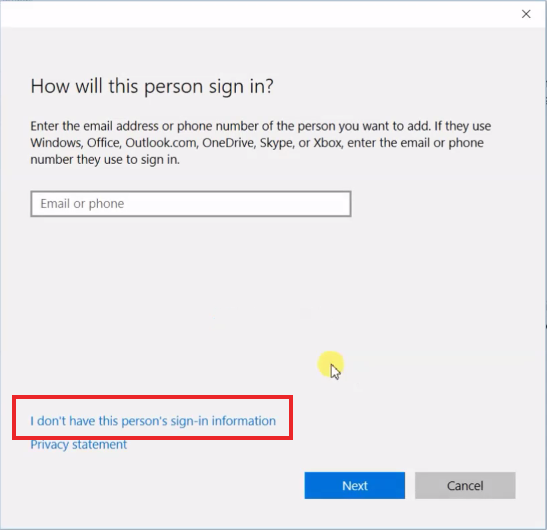
- Click I don’t have this person’s sign-in information
- Click Add a user without a Microsoft Account
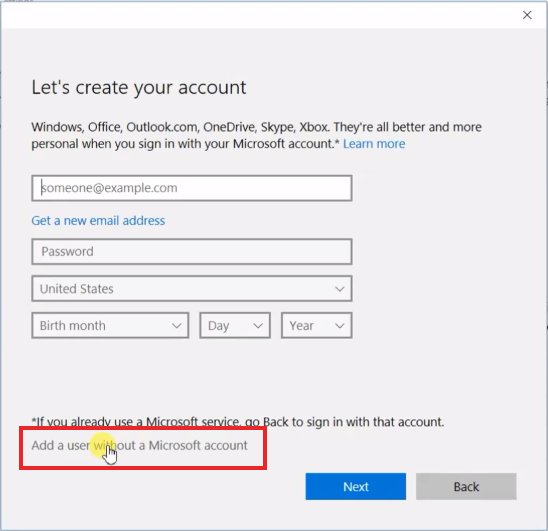
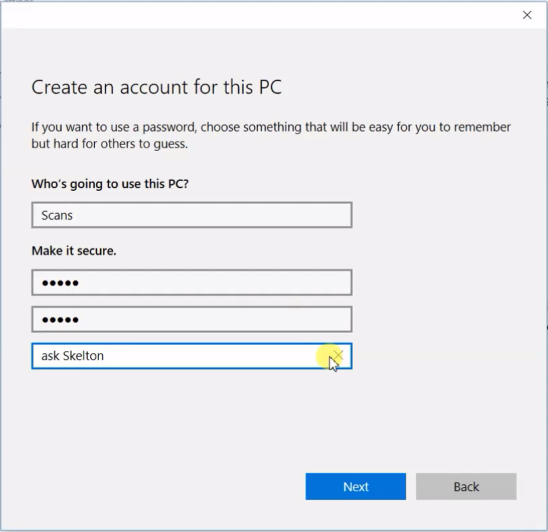
- Enter the account name and password of your choosing, and leave a hint in case you forget the password. Click Next.
Create and Share the Folder You want to Scan to
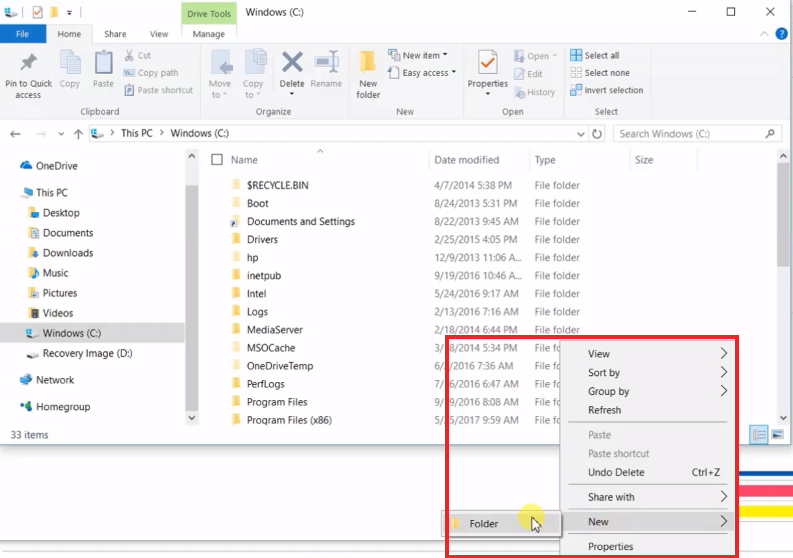
- Open Windows Explorer and browse to the C: drive, or wherever you want you your scan folder to be. Right-click on the empty area and move to New > Folder
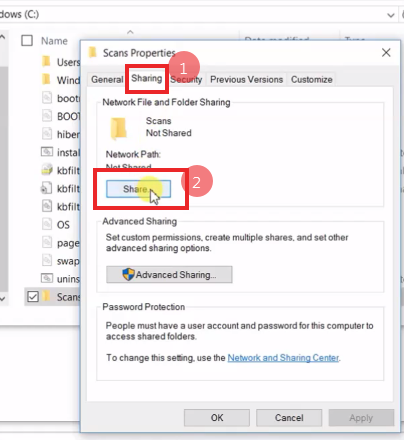
- Name your folder, then right click on it and go to Properties. Then click the Sharing tab, and click the Share button.
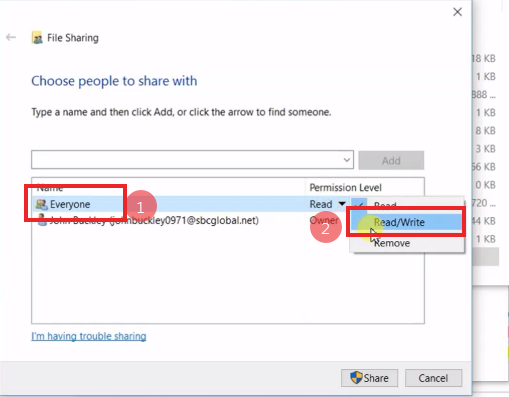
- You can enter Everyone into the box next to Add, then click Add. Then change the permission level to Read/Write and click Share at the bottom.
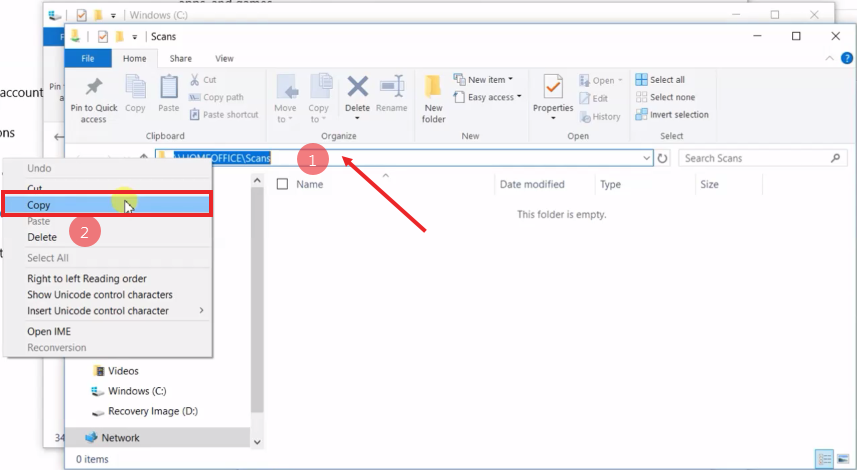
- Double-click on the path to open a new explorer window in that folder
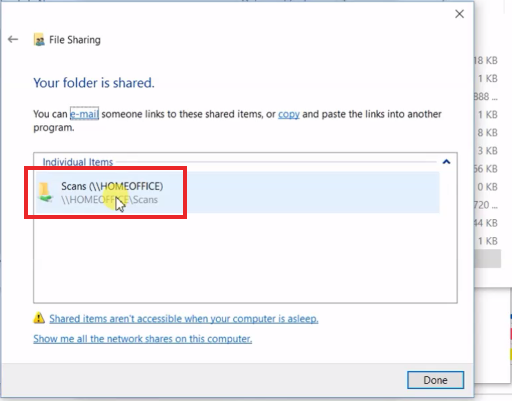
- Click on the address bar to condense the path, then right click and copy the folder path
Create the button in the Address Book on the Sharp Copier
- Open the web page of your copier by typing the IP address of the copier into the address bar of a web browser. You should have printed this before we started, see the top of the page if you don’t have the IP.
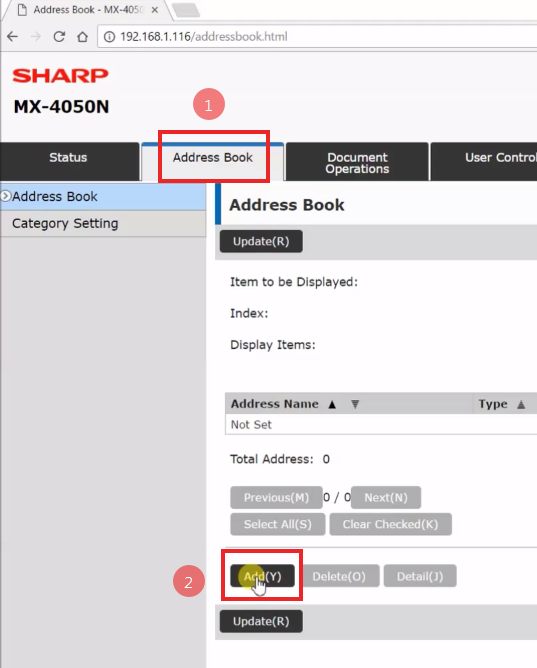
- Click on the Address Book tab, then click Add
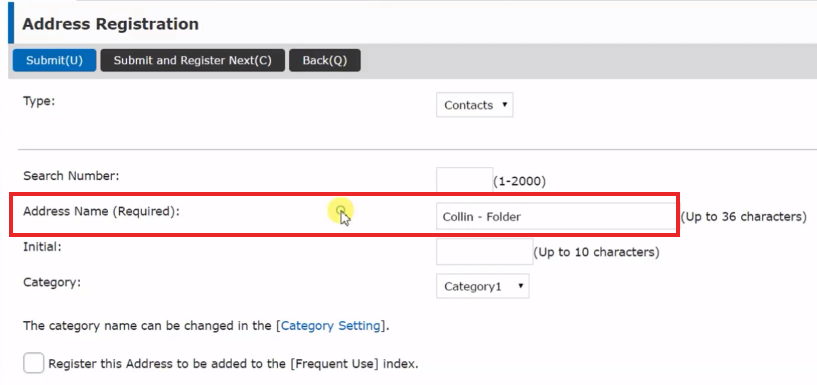
- Enter the Address Name, this is what the button on the copier’s touch screen will read so an individuals name or a department works best here
- Scroll down and change to the Network Folder tab. Paste the copied folder path into the folder path box, then enter the username and password you created earlier. You can use your regular sign-in information or domain username/password if you’d like, but I feel it’s easier and more permanent to create a local user with a password that will never change.
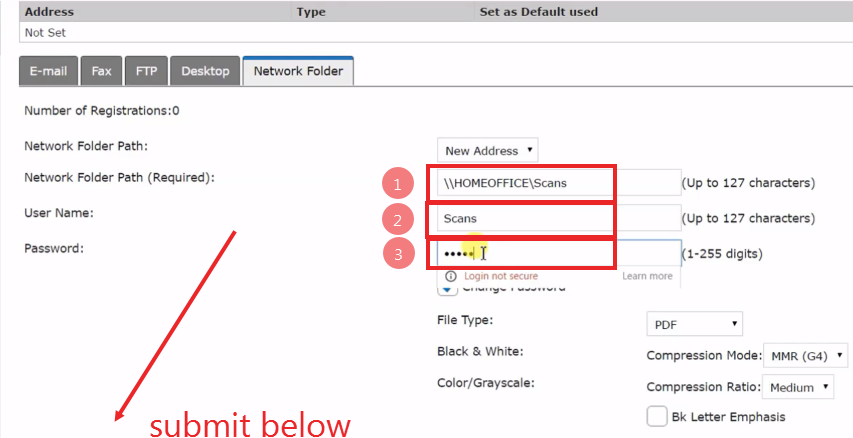
- Click Submit

In Conclusion
The Sharp should now successfully scan to your shared network folder. Check out our How To tab for more helpful information on setting up specific functions with your Sharp copier.
If you’d like pricing on a Sharp MFP that will copy, print, scan and fax then use our quote request page!

The old copiers can’t scan to SMBv2
You can add SMBv1 support on your Windows 10 / Server
On Windows 10 / Server go to Control Panel —> Programs and Features —> Turn Windows features on or off
Select from the list SMB 1.0
Old copiers CAN scan to SMBv2. You simply need to use the IP address in the path statement, instead of computer name, and specify port 445 – e.g. \\10.0.15.200:445\Scans
I was not aware of this thanks for bringing it to our attention.
I tried this but I get a network/timeout error. Do I need to change something on the client?
Your are a life saver! Enabling SMB 1.0 did it for me. Thank you!
LOVE LOVE LOVE. Been looking for the cause and this was it!!
I keep on clicking the step #6 but it doesn’t show the next page which is supposed to be step#7. How to do this?
I’m not sure, if your version of windows differs from the one in the demo, you’ll need to do some research on how to create a user. Of you could use your username for authentication if you setup a password with it.
If you have an earlier version of Windows, you add users in Control Panel, User Accounts. If you do that with Windows 10, it just takes you to the pages you see above. Earlier versions allow for managing users there and adding new user. Keep in mind that if you add a user, it will show up on your logon screen. There is a way to edit the registry to hide that user but that shouldn’t be attempted by people who don’t know the operating system well enough to add users. Don’t forget you will need to add a password to a new user that exactly matches the password for the account you created on the copier. Good luck!
For others, using the IP address like this in your copier: //192.168.1.X/scandirectoryname
will work around DNS problems you may have without introducing more. Be sure that on the copier network address, you have added the correct gateway address (usually your router).
Also, remember your antivirus may be blocking access to the PC for other devices on the LAN so check your PC firewall settings if you need to open ports or set device trust levels for your copier address.
Setting up SMB1 is not recommended. Some of the really bad network ransomware viruses travel through that route to infect a network. Quickbooks may have required the closing of that port and they have a tool that does so. If you can’t get it to work with later versions of SMB protocol, you can set up Email rather than scanning to folder which is safer than losing everything. Lots of older copier motherboards do not have the capability of working with SMB2 or SMB3 no matter what firmware updates you do. The solution is to get a newer copier if you want to scan to folder.
I’ve found that a lot of people are taking documents on their PCs, printing them to the copier, then scanning the document as a PDF to their folder. Really. All you have to do is print to PDF and you can be done in one step. It’s built into Windows 10 and Quickbooks has its own PDF printer/distiller.
I recently bought a Sharp Ar-M550N printer for office but am unable to connect the office computers to the printer. I have tried connecting it to Ethernet connections but it still doesn’t pop up in my printer list. I looked up how to do it but every website that says I’m able to download the original connection the website doesn’t have the AR-550N model or its our dated so I would appreciate your help
Thank you
You’ll need to give your machine an IP address that’s on your network and manually setup the printer. They do not always show up when you search for a printer in Windows. If the machine is on DHCP in the network settings and you run the driver install executable file it should find it on your network and install it for you. That model is a bit outdated though.
The “Network Folder” option isn’t available on my office’s MX-M363U copier. Does it allow / support scanning to network folder?
That model requires a MX-PB11 print controller and MX-NSX1 for scanning. If it has both of these options it should be able to scan to network folder. Printing/scanning did not come on the MX-M363U from the factory, unfortunately.
Hey Man you rock!
I have a Hp LaserJet that was driving crazy to install the scanner and network drive/folder… this was what I needed!
Thanks1
The Network folder option is not available in Ar-5520N copier. what do I do?
I am not familiar with this model, Sharpdesk software may be an option.
when im scanning on my sharp Mx 2010u it saids Network Error CE-00 consult your network administrator can u help me pls
I am trying on DX-2000U,
there is an error
“Selected server are not found Consult your network administrator”
I also have tried on MX-1810U but the same error
what is the problem???
Please reply as soon as possible
Hi there,
I have tried as per your instruction but not working, coming same error CE-00, If you have another suggestion or guide please help me as soon as possible.
Try turning off your anti-virus program and see if the scan goes through. If not, you may need to update the firmware in your copier to include current SMB version 2.0. If it works your anti-virus is blocking that transmission and you may need to whitelist traffic from your copier’s IP address.
We lost Scandesk functionality with newest Windows 10 updates. MX-M283N so attempted to set up SMB scan. Followed the Windows 10 instructions carefully. Permissions for Everyone on shared etc. Activated SMB V1. When try to scan …Says “selected servers not found consult Network Admin”. SSL is enabled. do we perhapa need to do something in the SMTP area?
TIA !
SMTP is for email scanning. Presuming you have your DNS setup and you’re still getting that error it’s likely than an antivirus program is blocking that traffic. Try turning it off and scanning, and if it goes through you need to adjust your firewall settings to allow traffic from the copier.
Thanks! Found out our IT had a new antivirus program on server. Adjusted. All good.
Will the above instructions work for the MX-M363N?
The interfaces look a little bit different but the steps are more or less the exact same.
Will these instructions work for newer Sharp MX machines like MX5111 and MX3570
Yes, the screenshots may vary a little bit but the steps are more or less the same.
I have a MX-4110N and i have followed all of the steps. I can find the folder in the address book, but id does not appear on the main screen
On the web page of the machine you’ll need to go to System Settings, Image Send Settings and check the “show all addresses regardless of type” box then click submit.
Dear sir
My name is ntsikelelo ivan James. Could you please send me all the steps scan to folded on my email address
i have followed instruction to set up scan to folder.
created a folder single name no spaces or special correctors give read/write rights.
created a secondary account with ease log in.
input that in to the address book with destination but no mater what I try I still get the
“ce-00”
anything you could suggest to try would be greatly appreciated.
If you’ve done all of that it sounds to me like your anti-virus is probably stopping it.
hello, I am did everything u said, i have sharp mx3100n. getting CE-00 error. consult your IT guy. why? windows 10 here with windows defender, i turned off now. not working.
The PC connected with wifi can print on wired network Sharp MX-4071 printer. But the the PC can’t receive scanned document from the printer. Please advise.
when i add the user for scan to folder in the system , while scanning it will showing server connection failed.
Hello,
Thanks for that.
I have a question. Why is the first step “Create the User for Scanning Authentication” needed? Can’t you just do it with your Admin account? Why is it better to create a new account for the scan?
Thanks a lot.
Yes, you could certainly use an any admin account, or any account that you add in the sharing settings for the folder.
Any idea if the MX-B402SC supports SMB 2 or 3 for scanning to a shared folder/ if there is a firmware update to allow it to?
Is above steps same for Sharp Mx 4071 Printer to scan to Desktop on Windows 10 64bits computer?
For the most part.