
Most businesses treat their copier like a water fountain — accessible to everyone, all the time, no questions asked. And just like a water fountain, nobody thinks about it until there’s a problem. The supply bill comes in high. A confidential document shows up in the output tray unclaimed. A department burns through its paper budget by March.
The fix isn’t a new machine. It’s a feature that’s already built into every Sharp BP Series copier sitting in your office right now: User Control.
Specifically, this article is about using user number codes — simple 5–8 digit numbers — to lock down access, control what each person can do, and generate usage reports that actually mean something. No IT department required. No Active Directory integration. Just clean, practical control over one of your most-used office assets.
The Control Problem Most Businesses Ignore
When a copier is open to everyone with no authentication, you have no control over:
- Who is using it — and how much
- What functions they’re using — color vs. black and white, fax, USB, external scan
- Whether usage aligns with job role — a warehouse employee printing 400 color pages a month is a red flag
- When something goes wrong — no record, no accountability, no way to trace it
User codes solve all of this. Once enabled, every person who wants to copy, print, scan, or fax has to enter their assigned code first. The machine logs every action under that code. You set the rules. The machine enforces them.
What You Can Actually Control
Who Gets Access at All
With User Control enabled, the machine is locked. No code, no access. That alone eliminates walk-up use from visitors, temps, or anyone who shouldn’t be printing on your dime.
What Each User Can Do
Through Authority Groups, you define exactly what each class of user is permitted to do. Examples:
- Receptionist: Copy and scan only — no color, no fax
- Sales team: Full color printing and scanning, no USB
- Management: Unrestricted access
- Warehouse staff: Black-and-white copy only
You build the groups once, then assign users to them. If a role changes, you update the group — every user in it adjusts automatically.
How Much Each User Can Print
Page Limit Groups let you set a monthly ceiling — by function — for any user or department. Once they hit the limit, they’re blocked until an admin resets the count. This is one of the most effective behavioral controls available because it changes how people think before they hit Print.
The Full Audit Trail
Every session is logged. At any point, you can pull a report from the web interface showing exactly how many pages each user printed, copied, scanned, or faxed — broken out by color and black-and-white. Export it to a spreadsheet, use it for departmental chargebacks, or just keep it as a record. Reset the counts at the end of each billing period and start fresh.
Setting It Up on the Sharp BP Series — Step by Step
These instructions apply to the Sharp BP Series, including the Sharp BP-50C, BP-55C, BP-60C, BP-70C, BP-50M, BP-70M, Sharp BP-51C, BP-71C, BP-51M, and BP-71M series multifunction printers.
Before you start: Have the machine’s IP address ready. You’ll also need admin access to the web interface.
Step 1: Find the Machine’s IP Address
Print a network configuration page from the machine:
- On the home screen, tap Settings
- Tap the Status tab
- Tap Network Status on the left menu
- Note the IPv4 address listed
Step 2: Open the Web Interface
- On any computer connected to the same network, open a web browser
- Type the machine’s IP address into the address bar and press Enter
- The Sharp administration portal will load
Step 3: Log In as Administrator
- Click Administrator Login (upper right corner of the page)
- Enter the admin password (admin by default)
- You now have full access to the machine’s settings
Step 4: Enable User Authentication by User Number
- In the left menu, click User Control
- Select Authentication Settings → Default Settings
- Set User Authentication to Enable
- For the authentication method, select By User Number
- Click Submit
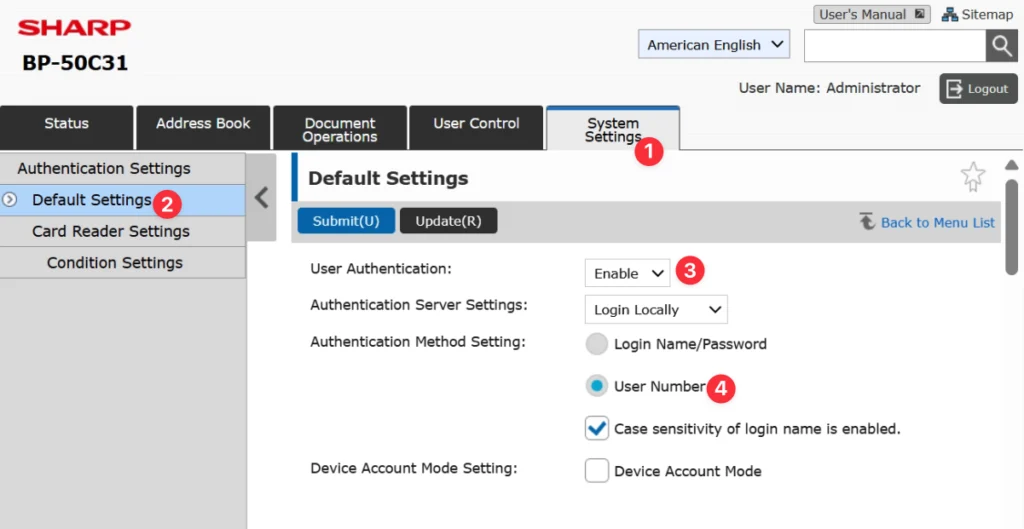
The machine is now in lockout mode. No one can use any function without a valid code. Complete the remaining steps before leaving.
Step 5: Create Authority Groups
- Go to User Control → Access Control Settings → Authority Group
- Click Add
- Name the group and configure which functions are permitted (color print, B&W print, copy, scan, fax, USB, etc.)
- Click Submit
- Repeat for each group you need
Start simple — two or three groups covers most businesses. You can always refine later.
Step 6: Set Page Limits (Optional but Recommended)
- Go to User Control → Access Control Settings → Pages Limit Group
- Click Add
- Name the limit group and enter monthly caps for each function: color copies, B&W copies, color prints, B&W prints, etc.
- Click Submit
Step 7: Add Users
- Go to User Control → User Settings → User List
- Click Add
- Enter the following for each person:
- User Name: Their name, for reporting purposes
- User Number: A unique 5–8 digit code you assign them — this is what they enter at the machine
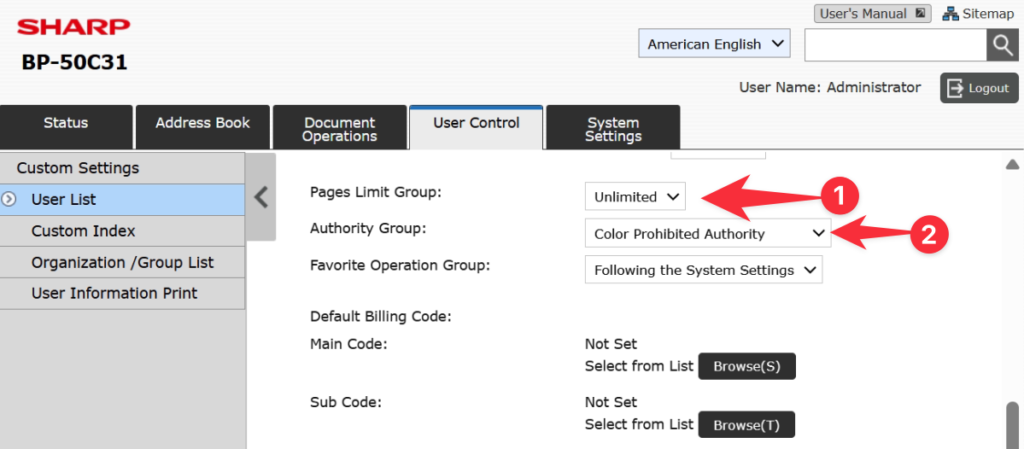
- Authority Group: Select from the groups you created in Step 5
- Pages Limit Group: Select if applicable from Step 6
- Click Submit
- Repeat for each user
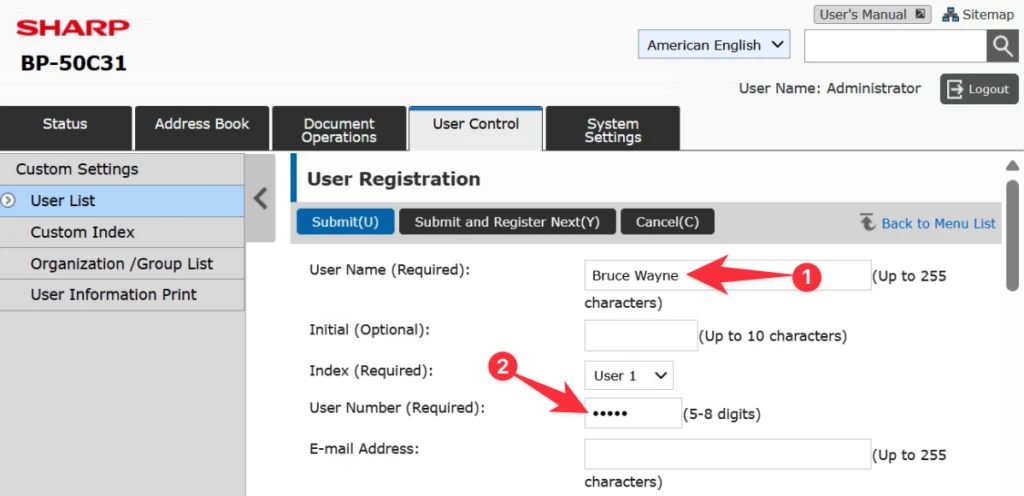
Tip: Use a consistent numbering format — employee ID numbers, phone extensions, or sequential codes all work. Keep a secure master list. You can register up to 1,000 users on BP Series devices.
Step 8: Configure the Print Driver on Each Workstation (Windows)
This step is required for printing to continue working from computers. If skipped, print jobs will be rejected or held indefinitely.
- Go to Settings → Devices → Printers & Scanners
- Select the Sharp printer and click Manage → Printing Preferences
- Click the Job Handling tab
- Check User Number and enter the user’s assigned code
- Click OK
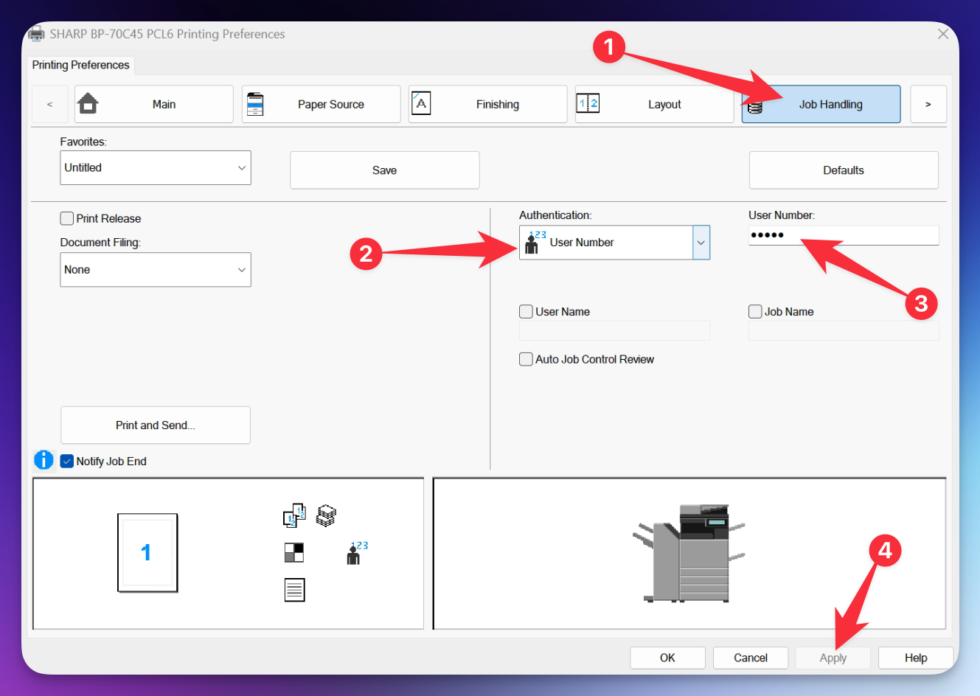
For shared workstations: Check the Auto Job Control Review box instead of entering a fixed code. This prompts whoever is sitting at the computer to enter their own code before each job is sent — no one prints under someone else’s account.
Step 9: Verify the Setup
Walk to the machine and test:
- Tap Copy — the login screen should appear
- Enter a valid user code — confirm the correct functions are available
- Send a test print from a configured workstation — confirm it prints and logs correctly
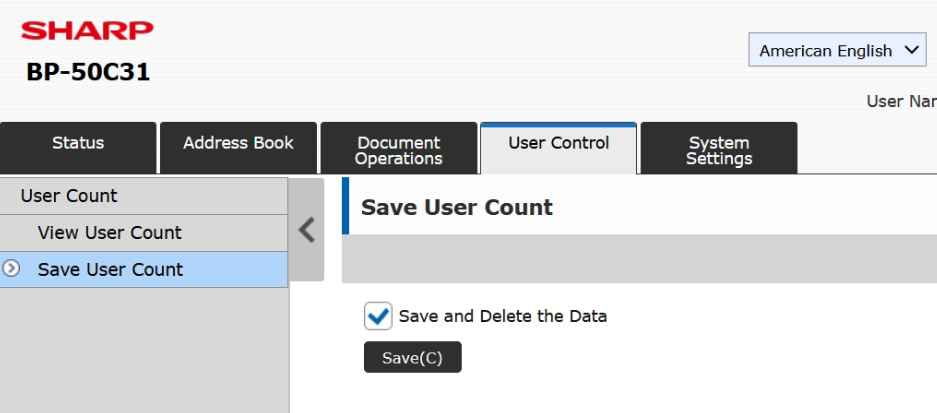
Step 10: Pull Reports and Reset Counts
To view usage:
- In the web interface, go to User Control → User Settings → User Count
- Review the per-user breakdown across all functions
To export:
- Click Save to download usage data as a CSV file
To reset counts:
- Select the users you want to reset and click Clear Count
Do this at the end of every billing cycle to maintain clean period-over-period records.
Important Caveat: AirPrint Does Not Work Well With User Codes
If anyone in your office prints from an iPhone, iPad, or Mac using AirPrint, you need to know this before enabling User Control: AirPrint is not compatible with user number (code) authentication.
AirPrint uses Apple’s IPP protocol to send print jobs directly to the machine, but it has no mechanism to pass a numeric user code along with the job. When User Control is active and set to authenticate by user number, AirPrint jobs will either be rejected outright or held in the queue indefinitely.
The practical workaround options are:
- Switch to username/password authentication instead of user number codes. AirPrint can pass login credentials (name and password) in some configurations, though this adds friction and isn’t always reliable across macOS and iOS versions.
- Use a dedicated mobile printing app instead of AirPrint — Sharp’s own print apps or third-party solutions that support authenticated printing are a better fit in environments with User Control active.
- Accept that AirPrint users will need a workaround — in most business environments, this is a minor inconvenience since the bulk of printing happens from Windows workstations where the print driver handles authentication cleanly.
If your office relies heavily on AirPrint — particularly in environments with iPads as primary devices — have a conversation with your dealer before enabling User Control so you can plan around it. It’s not a dealbreaker, but it’s not something to discover after the fact.
Frequently Asked Questions
Q: What if an employee forgets their code? As the administrator, you can look up any user’s code in the web interface under User List. Codes are visible in plain text to the admin — they’re not encrypted like passwords.
Q: Can we assign one shared code to an entire department? Yes. Create a user called “Accounting” and distribute a single code to the whole group. You lose individual-level tracking but keep departmental reporting. Many businesses run it this way by choice.
Q: What happens to print jobs sent with no valid code? Depending on your configuration, they’ll be held in a queue or deleted automatically. Nothing prints without a valid code on file.
Q: Does this apply to walk-up copying and scanning, not just PC printing? Yes — all four functions (copy, print, scan, fax) require authentication once User Control is enabled. The code must be entered at the machine’s touchscreen for any walk-up activity.
Q: Can we upgrade to Active Directory or LDAP authentication later? Yes. The BP Series supports both. The authority groups and page limits you configure now carry over, so you’re not starting over — you’re just changing the authentication method.
The Bottom Line
A copier without User Control is an open resource with no accountability. A copier with User Control is a managed asset — one that tracks usage, enforces policy, restricts access, and generates the data you need to make informed decisions about your print environment.
The feature is built into every Sharp BP Series machine. The setup takes under an hour. And the control it gives you pays off immediately.
If you’d like help configuring User Control on your Sharp BP Series, or if you’re considering a new machine and want these settings configured from day one, reach out to your local Sharp dealer.
These instructions apply to the Sharp BP Series, including the Sharp BP-50C, BP-55C, BP-60C, BP-70C, BP-50M, BP-70M, Sharp BP-51C, BP-71C, BP-51M, and BP-71M series multifunction printers.
Nationwide Sales and Service
While Skelton Business Equipment, a Division of Platinum Copier Solutions, is based in Houston, we offer sales nationwide and have a partner for service in all major US markets. Your company interfaces with one vendor to handle it all!
Advantages of vendor consolidation:
- Automated meter collection for maintenance billing
- Consolidated billing for lease and maintenance
- Common model print fleet with matching touch-screen interfaces
- Standardized setup configuration so all of your equipment has identical settings at installation
- Support tools for IT staff to manage entire fleet
- One contact for sales and service!
- Pro-active toner shipment with PrintAnista (*opt-in)
